Configure WebServer and Python Interpreter using Container - Docker

What is Docker?
Docker is an open platform for developing, shipping, and running applications. Docker enables you to separate your applications from your infrastructure so you can deliver software quickly. With Docker, you can manage your infrastructure in the same ways you manage your applications.

In this article, I’m going to show some tasks performing on the Docker Container which will help you to understand more about container technology.
Tasks:
- Configure WebServer on the top of Docker Container
- Setting up Python Interpreter and running Python Code on Docker Container
Prerequisites:
- I’m using Redhat AMI on AWS cloud.
Installing Docker:
- As I’m using Redhat 8, so I need to first configure my own repo for installing the Docker because they don’t provide officially.
- For this, go to the location, /etc/yum.repos.d and then create a file docker.repo …

- Now for checking, it properly worked or not, run yum repolist

You also get some similar output…
- Now for installing the Docker-CE software, run
yum install docker-ce --nobest -y

I already installed it before. Finally, Docker installed successfully.👍
- As we have ISO file for installing any Operating System. In docker, we have docker images for installing any container. Go to docker hub and check more images.
For downloading any docker image, run
docker pull image_name:tag

I download CentOS image for doing tasks.
1- Let’s configure the WebServer on the docker container…
- Launching a new Container…
For launching a new docker containter, command is…
docker run -it -p local_port:docker_port -v volume:/directory --name os_name image:tag
let me break this into parts for better understanding…
[ --name ] — This tag we use for assigning a name to our container.
[ -v ] — We use this to mount our local directory to docker container so that when we save our files permanently. So if the container deleted somehow, our data will never be lost.
[ -p ] — We use this to bind local port to docker port so that we can expose our container to the outside world.
[ -it ] — This tag gives an interactive terminal to our container to run any command.

You can see, as I run the command it gives a new OS terminal.
We can check it by using command docker ps also.

Let’s configure WebServer now…
- 1st step: Install httpd software for launching the webserver.
yum install httpd -y

- 2nd Step: Put your code in /var/www/html

- 3rd Step: Start the httpd services…
Here if you try to start services using systemctl command, it failed because docker container doesn’t provide systemctl command.
So here we directly run exec file location to run httpd server…
/usr/sbin/httpd

Now let’s run IP:81/a.html in the browser…

But this stops the service after our container restart, so for making this permanently enable, we do some tricks here…
Open /root/.bashrc and write these two commands there…

Now let me check after restarting the container…

I’m using docker start and docker attach command for restart and then for a terminal.

It works perfect…👍
Now we can save this docker container as an image for any production/testing environment. Our webserver is already configured, we only need to run the image again which we going to create.
For this, we have command…
docker commit os_name image:tag

You can see our image is ready to use.
2- Setting up Python Interpreter and running Python Code on Docker Container…
For this, we can normally launch one OS and install python3 software to setup Python Interpreter…


And Now you can run your python code here…
But I want to make my own image which gives me a python Interpreter as I launch a container using that image…
Here the concept of Dockerfile comes in play. By writtng some code, we can make our docker images too.
- Creating a Dockerfile for python REPL (Live Interpreter)…

FROM centos:latest
RUN yum install python3 -y
CMD [“/usr/bin/python3”]
Save this in a file named dockerfile.
Now build the image with this dockerfile using command…
docker build -t myrepl:v1 .

Now let’s run this image…

2. Now if we need to run a python file in our docker container, for this I’m creating one more image…
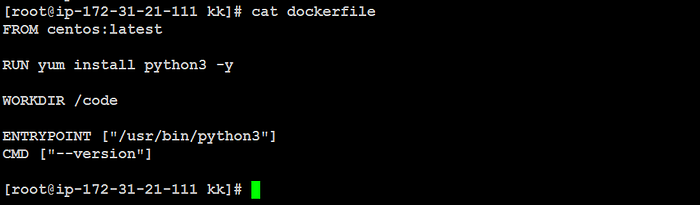
FROM centos:latest
RUN yum install python3 -y
WORKDIR /code
ENTRYPOINT [“/usr/bin/python3”]
CMD [“ --version”]
Save this code in a file named dockerfile and run command…
docker build -t name:tag .

Now let’s run this container and check it worked or not…
I created one file named a.py in my local OS and then mount this folder to my docker Container…

It works…🤗
Do Clap if you find it worth…🙌
Thanks for reading :)